Sunday 25 December 2011

The Colour Scheme

I keep changing my mind... Luckily, with the aid of photo editing software, I have come up with a few colour schemes.  The sport blue is still my favourite.  Though it is so hard to choose!! :)
I have polished the forks, and am yet to get exhaust, tank and wheels painted... but progress is happening!


Saturday 24 December 2011

The Build up - Part 1

Christmas Eve, a bottle of Dimple Scotch, and a Brother in law... equals a very funny & greasy build up! Its amazing how long it can take to clean out a bolt hole that is full of soda from the blaster!  hehehe, Educated thought did prevail, and a combination of a vacuum and WD40 blasted that rubbish out! :)
 I was going to clean up the OEM shocks, and put double bump stops on them, but, alas, my travel reduction plan was thworted by the new undertail.  Damnit.  New longer shocks need to be purchased ASAP.
Hmm... hang on, maybe I can lengthen the mount on the shock body. 

 Of Course, due to an overzealous desire to 'finish' it, handle bars were installed well ahead of schedule!  The Pro Taper's look just right :)

 Installing my newly rebuilt carbs, was a particularly funny and difficult thing to do, with two guys being weakend by scotch!  Be-gone airbox!  The pod filters look awesome :)

Check out the side covers! A set of stainless/alloy allen bolts will be used for the side covers ... will look very flat tracker.
It looks so awesome, what a xmas present !  I am one lucky husband :)

The Pick Up

24 December 2011 - Pick up of the final pieces of my frame from the boys at 'Simca' Crash Repair.  Simon and his team have gone above and beyond to get my frame altered, blasted and painted before xmas, so I can be like every other customer, and be demanding and want everything in five minutes.  :)

They fabricated my side covers, rear hoop and undertail in fine form, exactly how I wanted! I couldn't be happier with the work they did, interpreting my photoshopped images, and very ordinary sketches :)
Anyways, proof as they say is in the pudding.  See below!


Monday 12 December 2011

The Engine Clean

Finally, got my engine back from the Soda blaster guy.  He did a great job cleaning up the engine, ridding it of all that tacky black paint and years of road grime.  All metal nice and clean again. :)
So, together with my shiney newly rebuilt carbs I got from the guys at Chappell Customs in the US, http://chappellcustoms.com/  I'll start putting it back together and in the frame in the next week or so when I get the frame back from the paint shop.


 The flash makes it all look amazing!  Pitty it really has that dark 'staining' in the metal... but looks fine for now , till I can afford to get the engine rebuilt.


Tuesday 29 November 2011

The Quick Steel

Problem: Cracked headlight bucket.  Solution?: 'Cargo QuickSteel' plastic repair compound ... YEA YEA!  So far, its an unbelievable product.  Cut off a piece, need it in your fingers till it gets nice and hot, stick it down and mould it quick as you can... leave over night.  BOOM!  Hard as a rock and ready to grind and sand.  Yes... grind.  They don't call it 'Quick Steel' for nothing!
 We'll see how well it holds up after painting and drilling....and miles of vibration. Hmmmm I'm skeptical.
Lucky for me, the chrome surround cleaned up nicely with some steel wool, and once I polish it, she'll sparkle like new.  So, off to the local Auto barn to get some plastic primer ready for a few coats of satin black.


Other updates.  Finally I got out of my work chair, and took my frame to the guys lucky enough to take on the minor mods to the rear of the subframe, blast clean, paint, and fabricate my new side panels.
  Hopefully, they will look a little like this bike below.  Cool. :)
The engine is off getting 'Soda Blasted' nice and clean ready to plop back into the newly painted frame. :) Can't wait to see it.  
Should look like the SOHC one the guy just completed a couple of weeks ago.  Nice, understated finish.


To be continued....

Monday 21 November 2011

Well, it has been a while, as life has got in the way of prepping my frame etc.  I hope to get the frame off to the guys to do my welding and paint job end of this week.  In the mean time, a bit of bling to keep my interest sparked.   A shiny new set of Pro Taper 7/8th "Carmichael" bend bars, and matching 'Rock Star' Grips.  

The bars are nice and low, and practially straight.  Should look very aggresive on the CeeBee. :)  
Not sure ... if I'll use the cross bar, or not.  Either way, the cross bar pad will be coming off... thats just a little tooooo much MotoX for me... :)


Thursday 20 October 2011

The Fix

Things are happening slowly. Damnit!  I just got my engine back from a local Aluminium welding shop, who, attempted to fix my broken engine mount in the lower crankcase.

Ended up not too bad.  Being a perfectionist, I would have liked to see it looking 'as new', but, alas, my $80 only stretched so far according to the guys.  Bit rich really, as I suspect it would have taken them a whole of 30 mins max.  Anyways, beats the hell out of stripping the engine and splitting the cases, to swap cases over!

So, she looks nice from the front now, and the rear, is well, under the engine, but might try and tidy it up with the dremel some more! :)

Best I get to and strip the rest of the paint of the engine now, to make it look decent.


Tuesday 18 October 2011

The Head Stem Bearing Seat

Hmm... I knocked the top bearing seat out with a few well placed taps with a large screwdriver, and a hammer.  No problems.  The bottom one?  Different story.  Gawwd.  A quick google suggests that they are put in by heating the head tube, and freezing the bearing seat, to shrink the bearing, and expand the head tube.  Voila!

How to remove?  Brut force flogging was not happening.  Prying wasn't either.  I fashioned a special one off "Tool XYZ", bearing seat remover.  Bashing the bejeezus out of it was still not budging it.  Twas like it was welded in place!

Brother in law to the rescue.  A loan of his awesome little Dremel rotary tool, with 2.5 cutting discs, a few incisions across the seat, a few well placed blows with "Tool XYZ" and PING! Out she came!  Only took me a week and a bit to figure out how to get it out!

Lil' Dremel will come to much use now... gave the forks a once over with the polishing tool.  Awesome.  Gets in all the nooks and crannies. :) Perfect.

A few pics of the remnants.... and a lil' visitor I had to place back in his natural habitat after he landed on me whilst trying to remove ones steerer bearing seat.....


Thanks god for Mr Dremel.  Bravo.


This is what happens when you flog the hell out of the frame... causes static electricity, and all the filings created these fabulous patterns! :)
 The offending bearing seat....
 
Tool XYZ! 
 

Thursday 6 October 2011

The 'Uh Oh'

Hmm... change of pace.  Lets see what I've bought as far as the engine is concerned.  Until now, have left the engine, very non-shallont, half on its side, in the middle of the floor & constantly in the way. Complete with fossilised spider eggs, webs, and some sort of ancient worm like creature wedged in a crevace around the gear selector shaft.

Testing my new strength thanks to 4 weeks with Tony Horton (P90 and P90X excersize videos), I easily lift the engine on to a trolley and wheel it outside and drench it in degreaser.  I give it a good hose off and inspect it to see where to needs a second squirt of degreaser.

Hmm... whats that? In the immortal words of one Homer J Simpson... "DOH!".   "Oh dear..." "Good lord" and other such words were exclaimed, and there it was.  The bottom right front engine mount hole in the lower engine crank case, is cracked through in 2 places.  The top crack is clean thru and a daylight gap of 1mm is visible.  The bolt hole is now oval, from probably 30,000kms (18,000 miles) of Oz's best roads wearing the hell out of the hole.

My suspicions have been confirmed.  This bike has had a decent accident on the right side, damaging that engine mount, the rear engine bolt, and foot peg bracket that I have replaced, as it was bent.  Doesn't help, that the engine weighs more than the rest of the bike.

The dilemma?  A quick google, and ring around, suggests that the engine, MUST, be pulled completely down, and I either have to replace the upper and lower case, or, hope that I can get the lower one welded up and strengthened.  Looking like either way, the engine has to be rebuilt now.  I was planning on cleaning it up externally, and running it.  Alas, that will no longer happen.

The next decision?  Do I try and pull it down and rebuild it myself, with my only prior engine work experience being a 140cc 4hp Briggs and Stratton re-ring 15 years ago?  Or, save my pennies and eat Maggi noodles for the next 6 months and send the engine to a experienced mechanic?

Decisions decisions....

The Polish

So the elbow grease starts...  I decided to polish the fork lowers, and some of the crank case covers, for that, not mirror, but nice shiny alloy look.

Of course, I don't have a bench grinder with polishing pad, or a dedicated polisher, only a couple of drill attachments, and good ol' elbow grease.  :) Trying to get the shine even is the challenge. 
The fork at the bottom of the pic, is as is, after stripping the paint off it.  NB: Motospray Quick Strip, is awesome pressure pack paint stripper.  Spray on, leave for 5-10mins, and hose off!  I even rang the chemist at the manufacturer, and checked that it is safe for alloy.  No problems there!

Cant' wait to attack the engine :)

Friday 30 September 2011

The Inspiration

Wrenchmonkees are a fantastic bunch of 'Denmarkians' based in Copenhagen.  They specialise in 'Brat Style' custom rebuilds of fantastic motorcycles such as Norton's, Triumph's, Kawasaki's and of course CeeBee's!
Shameless plug: http://www.wrenchmonkees.com/

I first fell in love with this bike below.  Exactly what I want!

 It has all the details that I want.  Flat seat, wide motorcross style handle bars, minimal instruments, shortened rear end, and pod filters on the carbs.  These guys really know how to make a sleek looking Brat/tracker style bike. 
 Some of their better bikes, hide the battery from the triangle part of the frame, so as to make it completely open.  There are some tricks like, using tiny lithium ion batteries etc, but, that means major work to the electrics, and, probably bump starting the bike, as the batteries only have enough juice for the instruments etc. I dont' want that.  Simple and not too much of a diversion fromt the stock electrics is for me.  I also love the electric leg.  Vintage motorcrosser's can keep the kick starter and bump starting!
 No doubt, to get through a roadworthy, I'll have to have some sort of longer rear fender, but you have to love the details they get away with over in the land of cheese and icecream!
There are many copy cat custom shops out there, but as far as I know, Wrenchmonkees 'pioneered' the Brat style as you see it here.  I love it.  So thanks WM for the inspiration.

The Sodablaster

What to do with all the painted and or extremely grungy parts that I want to resurrect?  Blast them!  How? I don't have a sandblaster, and, mostly I think they are too harsh anyway, so, a quick google and youtube search, exposes me to Sodablasting.

You can make you own.  Its easy, and really cheap.  Mine cost me $12 all up with 4 boxes of ammunition (baking soda).
http://www.youtube.com/watch?v=3UEGXwLUH24
And for a demonstration of its uber-ness -  http://www.youtube.com/watch?v=Fd8yqFJkn6A

I built it and went through 4 boxes of ammo.  Result? You get covered in white soda, and it does a pretty dam good job cleaning up alloy parts that had scale and gunge on it. Fantastic.  I wanted to strip the paint off my fork lowers, the engine etc. The poor lil' sodablaster, couldn't touch it.  In fairness, it does actually work, just very slowly, and you would need about 20cubic meters of soda to finish the job.  Fantastic for cleaning up small parts etc.  Though, I'll stick to my wire brush and elbow grease.

Myth... 1/2 BUSTED!

The Grind

First things first.  Lose the centre stand and the side panel tags.  No problems... a quick hit with the grinder, and she'll come up a treat.  WRONG!  Try around 4 hours of grinding and hand filing - not all in one hit as is true to my form though.  15 mins here, 15 mins there, 5 mins before I jump into the car for work.

Ugh.  Hand filing is the pits. But comes up a treat. 

Next problem.  Welding new bits on.  I have access to a MIG and an ARC welder, but the owner, unfortunately can weld, but not good enough for the CB.  And me? Never welded in my life.  Does soldering speaker wires count?

A call to my friendly local crash repair/ frame straightener/ custom workshop, reveals somewhere between $440 and $800 should get me what I want done to the frame. 


The idea?  Satin black epoxy paint, a hoop welded to the subframe, tags for a rear fender and 'inner guard', and maybe a little stiffening here and there.  The rear end of the bike should end up looking like the CRD (Cafe Racer Dreams) bike below. 

The Strip

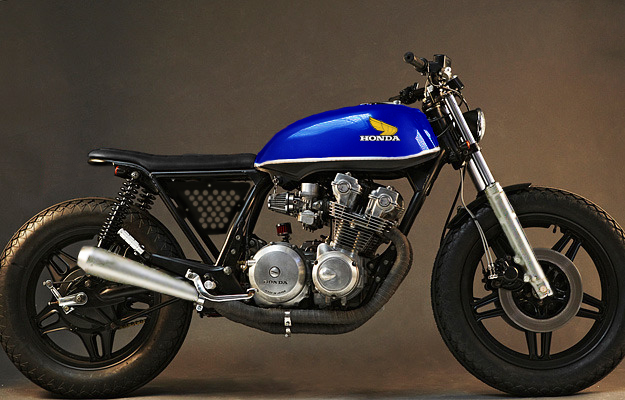
This is my first ever rebuild project.   So, taking to my new pride and joy, with white knuckled brute strength and shiney new ring spanners, I was definately a little aprehensive at first.  I decided on a plan, and set my self small goals, and proceeded to remove some wiring and whatnot for the lights etc, after pulling the hideous 35kg seat and luggage rack off.

It started to come apart very quickly.  Nothing like a car.  I thought to myself that it could easily be pulled down in a matter of hours. And, low and behold, time split over a week and a bit, it was pulled down in a matter of hours.

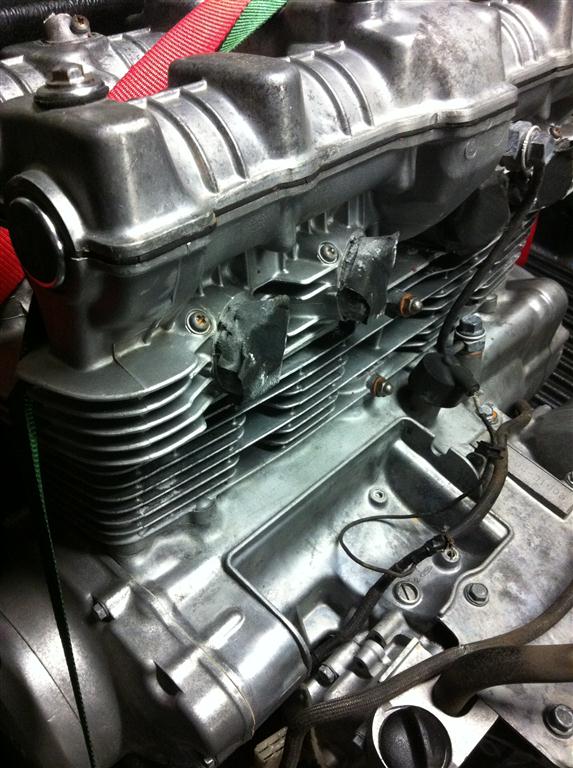
The thing that suprised me the most, was just how agricultural everything is, and, heavy.  Terrible hand done welds, mis-aligned frame pipework, tractor running board style footpegs weighing in at a metric ton!   The engine had me in histerics, just basking in its shoddily painted, over sized heft.   I, of course, with no means of making things easy, or, even an extra pair of hands, bumbled along pulling bolts out till that "ooh, I've pulled a few too many bolts out now..." moment swiftly followed by the "shoot, looks like the engine is coming out!" so, I wedged an old computer subwoofer, (the only thing with in leg reach whilst arms were stretching laden with the engine's mass) under the engine, and proceeded to do my best to give myself a hernia.  That engine, must weigh well over 100kg.  Just incredible.

I skidded it to a safe place on a piece of carpet and sat, sore, exhausted from my 10mins of hard labour, with arm pump and a throbbing sensation in my lower back.  I pondered.  Looking back and forth from my 2010 Gixxer, to the CB's air cooled heart that sat in front of me.  The Gixxer's 750 donk, is about 2/3 the width, 2/3 the height, 1/2 the weight, and, yes.... over TWICE the horse power!

Got to love technology.

Now what?  The thinking begins.  Who, What, When, Where, and How, am I going to attack this frame, and how am I going to design the new rear fender etc....

Monday 26 September 2011

The Beginning

Before I strip, a few pics are a must.  The ol' CeeBee is certainly an ugly beast in OEM trim.  Urgh.  Funny how styles have changed and evolved :)  How streamlined, light and sporty are the 'sports bikes' now!?
Pretty much complete, and mostly standard, save for a 'sports 4 into 1 exhaust', some non OEM replacement parts and a god aweful repair paint job and matching sticker applied graphics to the tank, she stands, a picture of sporting history in all its weighty glory.